개발/Infra
[Kubernetes] Canary 배포 환경 구성
지잉지잉
2022. 12. 30. 11:09
0. 개요
- Canary 배포란?
- 구 버전의 서비스와 새 버전의 서비스를 동시 구성, 일부 트래픽을 새 버전으로 분산하여 에러 여부 판단 및 모니터링 하는 배포방식
- 보통 구 버전은 PRODUCTION / 새 버전은 CANARY 로 서비스를 칭한다.
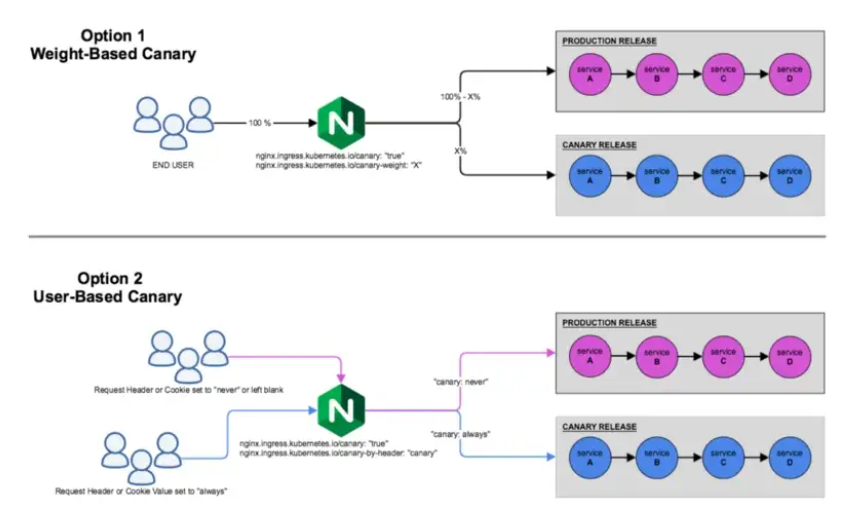
- k8s의 nginx-ingress-controller를 통해 트래픽을 분산할 수 있다.
- weight 기반: 100 - X % / X % 로 트래픽 분산 (random)
- cookie 기반: 요청의 cookie value를 확인하고 production / canary 서비스로 분산
- header 기반: 요청의 header value를 확인하고 production / canary 서비스로 분산
1. 테스트용 프로젝트 생성
- 간단하게 2개의 프로젝트를 구성한다.
- 동일한 API path를 가졌지만, 구 버전과 새 버전의 응답값이 다르게 (production / canary 구분 가능하도록) 구성했다.
@RestController
public class ProductionController {

    @GetMapping("/test")
    public ResponseEntity<String> test() {
    	return new ResponseEntity<String>("[PRODUCTION] requested.", HttpStatus.OK);
    }
}
@RestController
public class CanaryController {
@GetMapping("/test")
public ResponseEntity<String> test() {
return new ResponseEntity<String>("[CANARY] requested.", HttpStatus.OK);
}
}2. Docker build
- 해당 서비스를 k8s에 올리기 위해 Docker image를 만든다.
- Dockerfile도 간단하게 만든다..!
FROM adoptopenjdk/openjdk11
ARG JAR_FILE_PATH=./build/libs/TestProject-0.0.1-SNAPSHOT.jar
COPY ${JAR_FILE_PATH} TestProject-0.0.1-SNAPSHOT.jar
ENTRYPOINT ["java","-jar","TestProject-0.0.1-SNAPSHOT.jar"]- 해당 도커파일로 이미지를 빌드한다.
- 나는 구 버전을 test-project:0.0.1, 새 버전을 test-project-0.0.2 로 빌드했다.
$ docker build -t test-project:0.0.1 .
...
$ docker build -t test-project:0.0.2 .
...
$ docker images
REPOSITORY		TAG		IMAGE ID	CREATED		SIZE
test-project		0.0.1		...		1 minute ago	459MB
test-project		0.0.2		...		1 minute ago	459MB
3. Kubernetes 배포
- 구 버전 / 새 버전의 서비스 총 2개의 서비스를 Kubernetes에 올리기 위해 yaml 파일을 만든다. (커맨드로도 가능하다.)
- 아래 예시는 k8s deployment 생성과 service 노출(등록) 설정이다. production / canary 서비스 각각 이미지가 다르다.
- production-service.yaml
apiVersion: apps/v1
kind: Deployment
metadata:
  name: svc-production
spec:
  replicas: 1
  selector:
    matchLabels:
      app: svc-production
  template:
    metadata:
      labels:
        app: svc-production
    spec:
      containers:
        - name: svc-production
          image: test-project:0.0.1
          ports:
           - containerPort: 8080
---
apiVersion: v1
kind: Service
metadata:
name: svc-production
spec:
  type: NodePort
  selector:
    app: svc-production
  ports:
- port: 8080- canary-service.yaml
apiVersion: apps/v1
kind: Deployment
metadata:
  name: svc-canary
spec:
  replicas: 1
  selector:
    matchLabels:
      app: svc-canary
  template:
    metadata:
      labels:
        app: svc-canary
    spec:
      containers:
        - name: svc-canary
          image: test-project:0.0.2
          ports:
           - containerPort: 8080
---
apiVersion: v1
kind: Service
metadata:
name: svc-canary
spec:
  type: NodePort
  selector:
    app: svc-canary
  ports:
    - port: 8080
- 이제 위 2개의 파일을 가지고 서비스를 만들어보자
$ kubectl apply -f production-service.yaml
deployment.apps/svc-production created
service/svc-production created

$ kubectl apply -f canary-service.yaml
deployment.apps/svc-canary created
service/svc-canary created- 서비스 확인 (deployment, service, pod, replicaset 모두 정상적으로 생성되었다.)
$ kubectl get all
NAME			READY	STATUS		RESTARTS	AGE
pod/svc-canary-...	1/1	Running		0		1m
pod/svc-production-...	1/1	Running		0		1m

NAME				TYPE		CLUSTER_IP		EXTERNAL-IP	PORT(S)		AGE
service/svc-canary-...		NodePort	10.xxx.xxx.xxx		<none>		8080:32309/TCP	1m
service/svc-production-...	NodePort	10.xxx.xxx.xxx		<none>		8080:31373/TCP	1m

NAME					READY	UP-TO-DATE	AVAILABLE	AGE
deployment.apps/svc-canary-...		1/1	1		1		1m
deployment.apps/svc-production-...	1/1	1		1		1m

NAME					DESIRED	CURRENT		READY		AGE
replicaset.apps/svc-canary-...		1	1		1		1m
replicaset.apps/svc-production-...	1	1		1		1m
- 이제 해당 두 서비스를 클러스터 외부에서 접근하기 위해 ingress를 생성한다.
- Ingress도 서비스와 마찬가지로 각각 yaml 파일로 생성한다.
- production-ingress.yaml
apiVersion: networking.k8s.io/v1
kind: Ingress
metadata:
  name: production-ingress
  annotations:
    nginx.ingress.kubernetes.io/rewrite-target: /
spec:
  rules:
    - host: canary-test.com
      http:
        paths:
          - path: /
            pathType: Prefix
            backend:
              service:
                name: svc-production
                port:
number: 8080- canary-ingress.yaml 파일을 생성하기 전에! production ingress 부터 생성해보자
$ kubectl apply -f production-ingress.yaml
ingress.networking.k8s.io/production-ingress created
...
$ kubectl get ingress
NAME			CLASS	HOSTS			ADDRESS			PORTS	AGE
production-ingress nginx canary-test.com 192.xxx.xxx.xxx 80 1m- ingress를 생성한 후 kubectl get ingress 로 ingress 목록을 확인 할 때, ADDRESS가 아직 매핑이 안되있을 수 있다. (최대 n분 이상 소요 될 수 있다고 하니 기다려보자.)
- ADDRESS가 매핑이 완료되었다면 production 서비스의 API를 호출해본다.
$ curl http://canary-test.com/test
[PRODUCTION] requested.- production 서버의 API 요청/응답이 정상적으로 이루어졌다.
- 만약 정상 응답이 되지 않는다면 리눅스의 hosts 파일에 해당 host를 등록해야한다.
$ vi /etc/hosts

// 맨 아랫줄에 ip 호스트 등록
...
127.0.0.1	localhost
...
192.xxx.xxx.xxx canary-test.com
4. Canary 배포 설정
- 앞에서 production 서비스를 배포하고 ingress 도 설정을 완료했으니 이제 canary 서비스의 ingress 생성 및 설정을 해야한다.
- 그 전에 nginx-ingress의 canary 관련 annotations를 간단히 살펴보자면..
| annotations | type | description |
| nginx.ingress.kubernetes.io/canary | String | 카나리 배포 적용 여부("true", "false") |
| nginx.ingress.kubernetes.io/canary-by-header | String | header key 값 |
| nginx.ingress.kubernetes.io/canary-by-header-value | String | header value 값 |
| nginx.ingress.kubernetes.io/canary-by-header-pattern | String | 정규표현식을 사용한 header value 확인 |
| nginx.ingress.kubernetes.io/canary-by-cookie | String | cookie 기반 라우팅 설정 |
| nginx.ingress.kubernetes.io/canary-weight | String | weight 기반 라우팅 |
| nginx.ingress.kubernetes.io/canary-weight-total | String | 총 weight 수. (default: 100) canary-weight-total: 1000 canary-weight: 10 일 때, 1000번 요청 중 10번 요청이 canary 서비스로 요청됨 |
출처: https://github.com/kubernetes/ingress-nginx/blob/main/docs/user-guide/nginx-configuration/annotations.md#canary
- canary-ingress.yaml
apiVersion: networking.k8s.io/v1
kind: Ingress
metadata:
  name: canary-ingress
  annotations:
    nginx.ingress.kubernetes.io/rewrite-target: /
    nginx.ingress.kubernetes.io/canary: "true" # enable canary
    # weight 기반 라우팅 (100번 요청 중 50번)
    nginx.ingress.kubernetes.io/canary-weight: "50"
    # cookie 기반 라우팅 (cookie에 canary=always 로 설정시 canary 서버로 요청, canary=never 일 때 production)
    nginx.ingress.kubernetes.io/canary-by-cookie: "canary"
    # header 기반 라우팅 (header에 target=canary 로 설정시 canary 서버로 요청, 아니면 production)
    nginx.ingress.kubernetes.io/canary-by-header: "target"
    nginx.ingress.kubernetes.io/canary-by-header-value: "canary"
spec:
  rules:
    - host: canary-test.com
      http:
        paths:
          - path: /
            pathType: Prefix
            backend:
              service:
                name: svc-canary
                port:
number: 8080- 생성 및 적용
$ kubectl apply -f production-ingress.yaml
ingress.networking.k8s.io/production-ingress created
...
$ kubectl get ingress
NAME			CLASS	HOSTS			ADDRESS			PORTS	AGE
production-ingress	nginx	canary-test.com		192.xxx.xxx.xxx		80	10m
canary-ingress nginx canary-test.com 192.xxx.xxx.xxx 80 1m- http://canary-test.com의 동일한 호스트로 production / canary 서비스가 canary 배포 구성이 완료되었다.
5. Test
5-1. weight 기반 라우팅
$ curl http://canary-test.com/test
[PRODUCTION] requested.
$ curl http://canary-test.com/test
[CANARY] requested.
$ curl http://canary-test.com/test
[PRODUCTION] requested.
$ curl http://canary-test.com/test
[PRODUCTION] requested.
$ curl http://canary-test.com/test
[CANARY] requested.
5-2. cookie 기반 라우팅
$ curl --cookie "canary=always" canary-test.com/test
[CANARY] requested.
$ curl --cookie "canary=always" canary-test.com/test
[CANARY] requested.
$ curl --cookie "canary=always" canary-test.com/test
[CANARY] requested.
$ curl --cookie "canary=always" canary-test.com/test
[CANARY] requested.
$ curl --cookie "canary=never" canary-test.com/test
[PRODUCTION] requested.
$ curl --cookie "canary=never" canary-test.com/test
[PRODUCTION] requested.
$ curl --cookie "canary=never" canary-test.com/test
[PRODUCTION] requested.
$ curl --cookie "canary=never" canary-test.com/test
[PRODUCTION] requested.
5-3. header 기반 라우팅
$ curl -H "target:canary" canary-test.com/test
[CANARY] requested.
$ curl -H "target:canary" canary-test.com/test
[CANARY] requested.
$ curl -H "target:canary" canary-test.com/test
[CANARY] requested.
$ curl -H "target:canary" canary-test.com/test
[CANARY] requested.
$ curl -H "target:canary" canary-test.com/test
[CANARY] requested.